
A design patent drawing checklist exists because USPTO design examiners review formalities before they ever evaluate novelty or ornamentality. Every sheet is screened against 37 CFR 1.152 and 37 CFR 1.84 for margins, line quality, view count, and shading consistency; a single formal defect can trigger a notice that delays examination by months. Applicants who front-load this review into their drawing preparation process avoid the single most common (and most preventable) source of design patent office actions.
Most inventors assume a design patent gets rejected over prior art. In reality, a large share of first office actions have nothing to do with novelty at all. They are formal objections: a missing view, an inconsistent shading pattern, a margin that’s an eighth of an inch too narrow. These are the kinds of errors an examiner’s assistant can flag in under a minute, long before a primary examiner ever compares your design to the prior art.
That is exactly why a design patent drawing checklist matters so much to anyone preparing a filing, whether you’re a solo inventor, a product designer, or in-house counsel managing a portfolio. If you’d rather have a team that specializes in USPTO-compliant design patent illustration and formal drawing review handle this stage for you, that expertise is built around exactly this checklist, refined across thousands of design applications.
Below, we break down the 12 formal requirements examiners check first, why each one exists, and how to verify your drawings before you file.
What “Formal” Really Means in Design Patent Examination
Before diving into the checklist itself, it helps to understand the distinction examiners draw between formal and substantive review.
- Formal review asks: does this drawing physically comply with the USPTO’s presentation rules (sheet size, margins, line weight, labeling)?
- Substantive review asks: is the design new, non-obvious, and properly disclosed compared to the prior art?
Formal review always comes first. According to the USPTO’s design patent application guide, drawings are normally required to be in black ink on white paper, and black-and-white photographs are only accepted as substitutes under specific conditions. If your sheets fail that first formal gate, the application can be held up before an examiner ever weighs in on the design’s originality.
Consequently, a design patent drawing checklist isn’t a nice-to-have. It’s a filter that determines whether your application moves smoothly into substantive examination or stalls on paperwork.
Why Drawing Objections Happen More Often Than Applicants Expect
Design patent drawings sit at an unusual intersection: they need the visual polish of a professional product illustration, yet they must also satisfy a narrow, rules-driven federal standard that has almost nothing to do with aesthetics. That mismatch is precisely why so many otherwise well-designed products end up with objectionable drawings.
Consider how these applications typically get created. A product designer or engineer already has a polished 3D render or CAD file from development. It’s tempting to simply export that file, add some labels, and submit it as-is. However, product renders are optimized to look appealing to consumers, not to meet a formal disclosure standard. Gradient shading, reflective highlights, and soft-edge rendering styles that make a product look sleek in marketing materials often read as ambiguous or non-compliant under 37 CFR 1.152.
Additionally, many applicants underestimate how literally examiners apply the rules. A margin that’s off by a sixteenth of an inch, a shading style that’s slightly inconsistent between two views, or a missing broken-line statement in the specification are all treated the same way procedurally: as formal defects requiring correction before the application can move forward.
The real cost isn’t just the correction itself. It’s the delay. A drawing objection typically triggers a response period, often two months, during which the applicant must submit replacement sheets. If that deadline is missed, extensions come with additional fees, and in some cases the application can be abandoned entirely. For a product about to launch, or a design facing competitive knockoffs, that delay can matter far more than the underlying fix.
This is the core argument for treating a design patent drawing checklist as a mandatory pre-filing step rather than an afterthought: nearly every formal objection on this list is fully preventable with careful preparation, unlike substantive rejections, which depend on factors outside the applicant’s control.
Design Patent Drawings vs. Utility Patent Drawings
Applicants who have filed a utility patent before sometimes assume the drawing rules carry over directly to design applications. They don’t, and the differences matter enough to call out explicitly.
The biggest conceptual shift for someone moving from utility to design work is realizing that nothing outside the drawing defines the scope of protection. There is no lengthy written description of structure and function to fall back on. That’s why formal precision in a design patent drawing checklist carries so much more legal weight than it might for a utility filing.
How Long a Drawing Objection Actually Costs You
Applicants often ask how much time is really at stake if a drawing gets objected to. While timelines vary by USPTO workload and the nature of the correction, a rough sense of the process looks like this:
- Initial notice. The USPTO issues a notice identifying the drawing defect, generally with a two-month, extendable response period.
- Preparation of corrected sheets. The applicant (or their illustrator) revises the drawing set to resolve every identified issue.
- Resubmission and review. The corrected sheets are reviewed again before the application proceeds to substantive examination.
- Possible follow-up objections. If the correction introduces a new inconsistency, such as a proportion mismatch between the revised and original views, a second round of objections can follow.
Each of these steps adds real time to the pendency of the application, time during which the design remains unprotected and competitors have visibility into the pending filing through USPTO’s public records. Running the drawings through a complete design patent drawing checklist before the initial filing is, in almost every case, faster and less expensive than correcting them after an office action.
The Design Patent Drawing Checklist: 12 Formal Requirements
Here is the core list, organized in the rough order an examiner’s assistant typically works through a submission.

1. Correct Sheet Size and Margins
USPTO drawing sheets must be a consistent size throughout the application, either 8.5 x 11 inches (U.S. letter) or A4 (21.0 cm x 29.7 cm). Mixing sheet sizes within one filing is a common, easily avoidable defect.
Margins matter just as much as sheet size. Required minimums generally run:
- Top margin: 1 inch
- Left margin: 1 inch
- Right margin: 5/8 inch
- Bottom margin: 3/8 inch
Every figure, including any reference numbers or view labels, must sit fully inside the usable surface these margins define. A figure that bleeds into the margin is a near-automatic objection.
2. Black Ink, Uniform Line Quality
Because the drawing is the claim in a design patent, line quality directly affects how examiners (and later, courts) interpret the scope of protection. Lines need to be:
- Solid black
- Consistently weighted
- Crisp enough to reproduce clearly when scanned or printed at reduced size
Faint lines, pixelated raster scans, or inconsistent line thickness across figures are flagged quickly, since they undermine the clarity of what’s actually being claimed.
3. Sufficient Number of Views
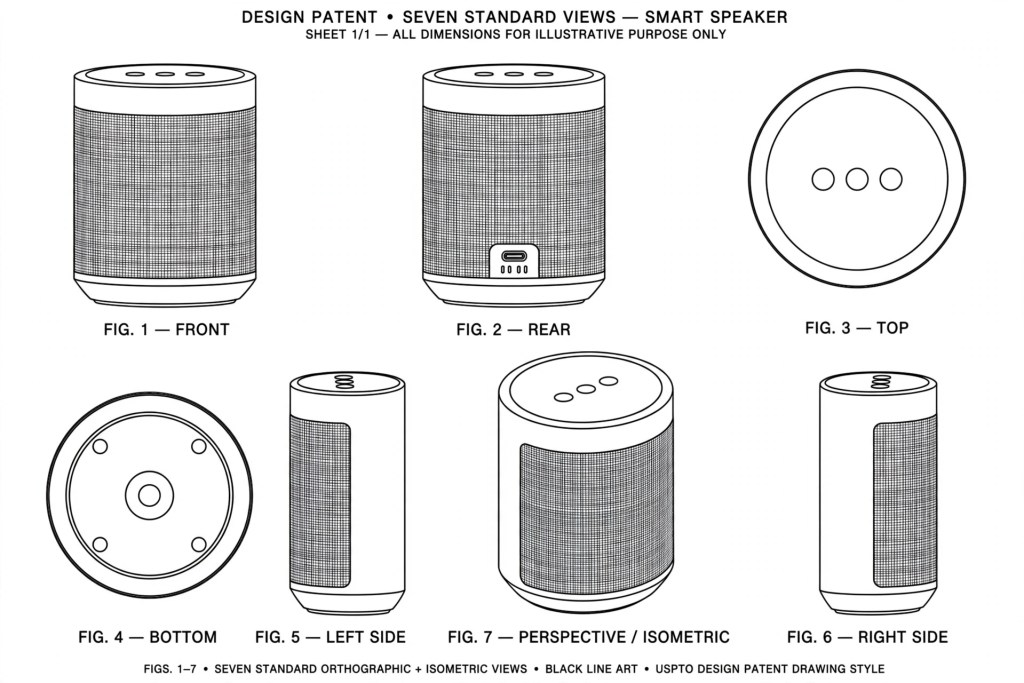
There is no fixed legal minimum, but as a practical standard, design patent drawings must include sufficient views to constitute a complete disclosure of the appearance of the design under 37 CFR 1.152 and MPEP 1503.02. For most three-dimensional articles, that typically means seven standard views: front, rear, top, bottom, left side, right side, and a perspective view.
Two-dimensional designs, such as surface ornamentation or icons, may only need one or two views. The governing question is always whether the view set, taken together, discloses the complete appearance of the claimed design without ambiguity.
4. Consistent, Sequential View Labeling
Each figure must be labeled “FIG.” followed by a number, in consecutive order (FIG. 1, FIG. 2, and so on), matching how the views are described in the specification’s brief description of the drawings. Skipped numbers, duplicate labels, or figure references that don’t match the specification text are formal red flags examiners catch almost immediately.
5. Appropriate Surface Shading
Surface shading communicates depth, curvature, and contour, which is essential in a document where the drawing alone defines the claim. While surface shading is not strictly mandated in every case, examiners expect it wherever it’s necessary to show the three-dimensional character of a surface. Flat, unshaded renderings of curved or contoured products routinely draw objections for failing to adequately disclose the design’s appearance.
6. Correct Use of Broken (Dashed) Lines

Broken lines serve a very specific purpose: they show environmental structure or unclaimed portions of an article, without claiming them as part of the protected design. Under 37 CFR 1.152, broken lines may be used to show visible environmental structure, but they may not be used to depict hidden planes or surfaces that cannot be seen through opaque materials.
Whenever broken lines are used, a matching statement must appear in the specification explaining that the broken-line elements form no part of the claimed design. Omitting that statement, or using broken lines inconsistently between views, is a frequent source of formal rejection.
7. No Solid Black Shading (With Narrow Exceptions)
This is one of the most misunderstood rules on any design patent drawing checklist. Per 37 CFR 1.152, solid black surface shading is not permitted except when used to represent the color black itself or to show color contrast. Designers accustomed to product renderings sometimes use solid black fills for visual emphasis; in a USPTO filing, that same fill can be read as an unintended claim to the color black, which triggers an objection.
8. Consistency Across All Views
Every view of the design must depict exactly the same object, at the same proportions, with matching contours. A slight asymmetry between the perspective view and the side view, for instance, invites both formal objections and potential 35 U.S.C. 112 enablement issues, since the drawing set no longer reads as a single, coherent disclosure.
Before submission, overlay or cross-check each view against the others (particularly dimensions that should visually correspond, like a handle’s height in both the front and side views).
9. No Alternate Positions Within a Single View
Design drawings cannot mix full and broken lines to show two different positions of the same component within one figure. If a design has moving parts or multiple configurations, each configuration needs its own separate, fully disclosed set of views rather than a single hybrid drawing.
10. Legible Scale and Reference Numbering
Figures must be drawn large enough that fine detail remains legible after the standard USPTO reduction for printing and publication. If reference numbers are used, they should be placed cleanly, without crowding the design itself, and applied consistently across every view where that feature appears.
11. Proper Handling of Color Drawings or Photographs
Black-and-white line drawings are the default. Color drawings or photographs are only accepted under specific conditions and typically require a separate petition explaining why color is necessary to the disclosure. If color is filed with the original application, it becomes an integral part of the claimed design, so any later black-and-white replacement sheets must be handled carefully to avoid a new-matter problem.
12. Figure Descriptions That Match the Specification
Finally, the brief description of the drawings in the specification must reference every figure by number and describe the type of view it represents (front perspective, top plan, and so on). A mismatch between what the specification claims to show and what actually appears in the drawing set is one of the more subtle checklist items, but examiners cross-reference the two documents closely.
Quick-Reference Checklist Table
Formal Objections vs. Substantive Rejections: A Comparison
Understanding the difference helps applicants prioritize where to spend their preparation time.
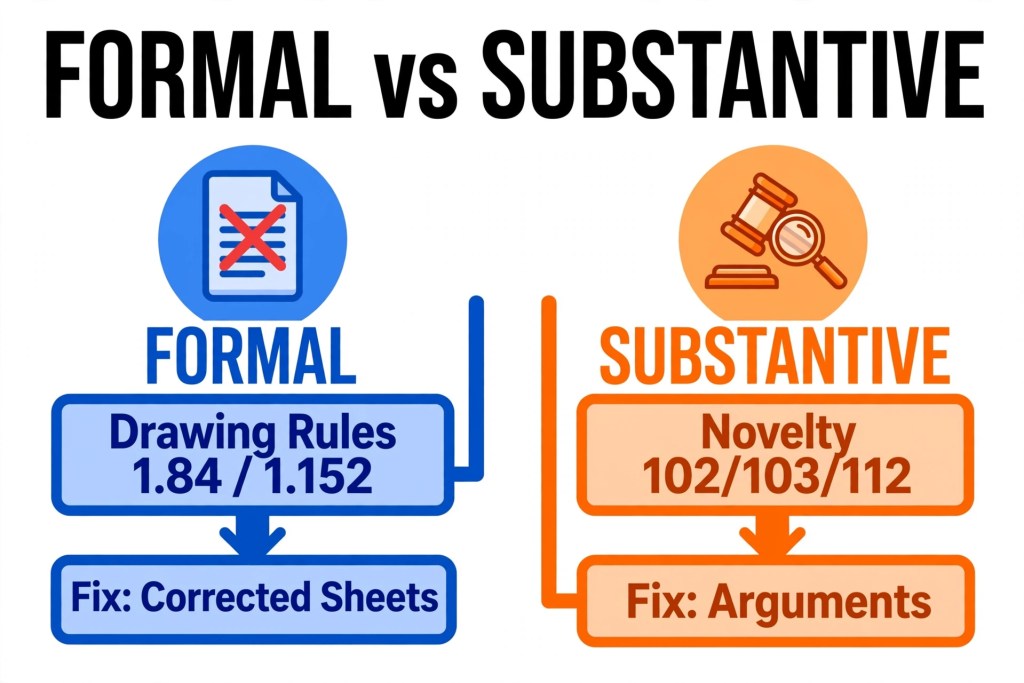
Because formal issues are so preventable, running your drawings through a structured design patent drawing checklist before filing is one of the highest-leverage steps in the entire application process.
Common Mistakes Applicants Make
Even experienced filers repeat a handful of avoidable errors:
- Treating design drawings like product renderings. Marketing-style 3D renders often include gradient shading, reflections, or solid black fills that don’t translate cleanly into USPTO-compliant line drawings.
- Skipping the broken-line statement. Using dashed lines correctly in the drawing but forgetting the corresponding specification language.
- Inconsistent proportions between views. Redrawing each view separately instead of generating them from a single accurate model, which introduces small mismatches.
- Underestimating view count. Assuming a “simple” product only needs two or three views, when the design’s full appearance actually requires all standard sides.
- Filing informal sketches from the provisional stage. Provisional applications allow rough sketches, but the non-provisional application that follows must include formal drawings meeting the full technical standard, without introducing any new matter beyond what the provisional disclosed.
- Ignoring sheet-to-sheet consistency. Switching drawing styles, shading conventions, or numbering formats partway through a multi-sheet submission.
- Waiting until after an office action to consult a specialist. Many applicants only bring in an experienced design patent illustrator once they’ve already received a drawing objection, which means paying twice: once for the original (non-compliant) drawings and again for the corrected set.
None of these mistakes are complicated to fix individually. What makes them costly is that they tend to surface late, often after the application has already been filed, when correcting them requires an amendment rather than a simple revision.

Expert Tips for Passing Formal Review the First Time
- Build from a single 3D model. Generating all required views from one accurate CAD or scan file, rather than drawing each view independently, largely eliminates proportion mismatches.
- Shade for contour, not for style. Ask whether the shading actually communicates the surface’s shape to someone who has never seen the physical product. If not, it likely needs revision.
- Draft the broken-line statement alongside the drawing. Write the required specification language at the same time you decide which elements to show in dashed lines, so nothing gets forgotten later.
- Do a side-by-side view audit. Lay every figure out together and check that corresponding edges, curves, and proportions line up across views.
- Keep a running figure log. Track each FIG. number against its view type and cross-reference it to the specification text before final submission.
- Review against the checklist twice. Once immediately after drafting, and again right before filing, since last-minute edits are a common source of newly introduced inconsistencies.
- Print a test sheet before final submission. Reviewing drawings on screen can hide margin or scale problems that only become obvious once a sheet is printed or reduced to the USPTO’s standard publication size.
- Separate design intent from engineering detail. Internal mechanisms, fasteners, or structural elements that don’t contribute to the article’s visible appearance generally don’t belong in the claimed (solid-line) portion of the drawing, and including them can unintentionally narrow the scope of protection.
- Loop in your illustrator early, not after a rejection. Involving someone familiar with 37 CFR 1.152 during the initial drafting stage, rather than only after receiving an office action, consistently produces cleaner first-pass results and shorter overall pendency.
Step-by-Step: Verifying Your Drawings Before You File
- Confirm sheet format. Check that every sheet uses the same size (letter or A4) and meets minimum margin requirements.
- Inspect line quality. Zoom into each figure at high resolution to catch faint lines, jagged edges, or scan artifacts.
- Count your views against the design’s complexity. Verify you’ve included every standard view needed to fully disclose the design’s appearance.
- Check figure numbering. Confirm figures run sequentially and match the specification’s brief description exactly.
- Audit shading conventions. Make sure surface shading is applied consistently and that no unintended solid black regions appear.
- Verify broken-line usage and statements. Confirm the specification includes the required disclaimer language for every dashed-line element.
- Cross-check proportions across all views. Look for asymmetries that would suggest the views don’t depict a single, consistent design.
- Confirm color drawing status. If color is used, verify a petition is prepared and filed alongside the application.
- Do a final read-through against the checklist. Walk through all 12 requirements one more time before submission.
Frequently Asked Questions
What is a design patent drawing checklist? A design patent drawing checklist is a structured list of the formal requirements, covering sheet size, line quality, view count, shading, and labeling, that USPTO examiners review before assessing whether a design is novel or obvious.
How many views does a design patent drawing need? There’s no single fixed number, but most three-dimensional articles require seven standard views (front, rear, top, bottom, left, right, and perspective) to fully disclose the design’s appearance under 37 CFR 1.152.
Can I use color in a design patent drawing? Yes, but only with a supporting petition explaining why color is necessary to disclose the design. Black-and-white line drawings remain the default format.
Why are broken lines used in design patent drawings? Broken lines depict environmental structure or unclaimed portions of an article so viewers understand context without those elements being claimed as part of the protected design. A matching statement is required in the specification.
What happens if my drawings fail formal review? The application typically receives a notice requiring corrected drawing sheets within a set response period. Missing that deadline can lead to abandonment, so working through a design patent drawing checklist beforehand helps avoid the delay entirely.
Is solid black shading ever allowed? Only when it represents the actual color black or is needed to show color contrast. Using solid black purely for visual emphasis is treated as a formal defect.
Do design patent drawings need reference numbers? Not usually. Unlike utility patent drawings, design patent illustrations generally omit reference numerals for claimed features, since the shape and appearance alone define the claim. Numerals may still appear in the specification’s brief description where helpful.
How is a design patent drawing checklist different from a utility drawing checklist? A design patent drawing checklist focuses on disclosing the complete visual appearance of an article, covering shading, broken lines, and view count under 37 CFR 1.152. A utility drawing checklist instead emphasizes illustrating and supporting written claims about how an invention works, typically under 37 CFR 1.84 alone.
Final Thoughts
A design patent drawing checklist turns a subjective, easy-to-overlook process into something repeatable. Sheet size, line quality, view count, shading, and broken-line usage aren’t creative choices; they’re formal rules an examiner’s assistant checks within moments of opening your application. Building each of these 12 requirements into your drawing workflow, rather than discovering them through an office action, keeps your filing moving toward substantive examination instead of stalling on paperwork.
If you’d rather not manage every line weight and margin calculation yourself, a dedicated design patent illustration team can prepare USPTO-compliant drawing sets built around this exact checklist, so your application clears formal review on the first pass. Get your design patent drawings prepared by PatentVisuals and file with confidence.