
To prepare patent drawings correctly, an applicant must translate an invention’s written claims into formal, examiner-compliant visuals that meet 37 CFR 1.84 (USPTO), PCT Rule 11 (WIPO), or the relevant regional drawing standard before filing. This means selecting the right drawing type (utility, design, flowchart, or chemical), following exact rules for sheet size, margins, line weight, view count, and reference numerals, and verifying every figure against the specification before submission. Applicants who prepare patent drawings this way, rather than treating them as an afterthought, consistently avoid the formal drawing objections that delay a large share of first office actions.
Most inventors budget plenty of time for drafting claims and researching prior art, then treat the drawings as a five-minute afterthought before hitting submit. That’s a costly mistake. Patent examiners rely on drawings to confirm what your claims and specification actually describe, and a sheet that doesn’t meet formal standards can stall your application before an examiner ever evaluates whether your invention is novel. If you’re wondering how to prepare patent drawings that clear formal review on the first pass, this guide walks through every stage of the process, from choosing the right drawing type to final file formatting.
Getting this right from the outset is exactly the kind of technical, detail-heavy work that dedicated 37 CFR 1.84-compliant patent drawing services are built around, since a single misplaced margin or missing view can add months to an otherwise clean filing. Below, we break the process down into a repeatable system you (or your illustrator) can follow for any invention type.
What Does It Mean to Prepare Patent Drawings?
To prepare patent drawings means converting an invention’s structure, function, or ornamental appearance into formal line-art figures that meet a patent office’s presentation rules; not a product render, a CAD export, or a marketing illustration, but a document with independent legal weight.
For a utility patent, the drawings illustrate how an invention works. For a design patent, the drawings are the claim itself; nothing else in the application defines the scope of protection. Consequently, the standard for “correct” isn’t aesthetic. It’s regulatory.
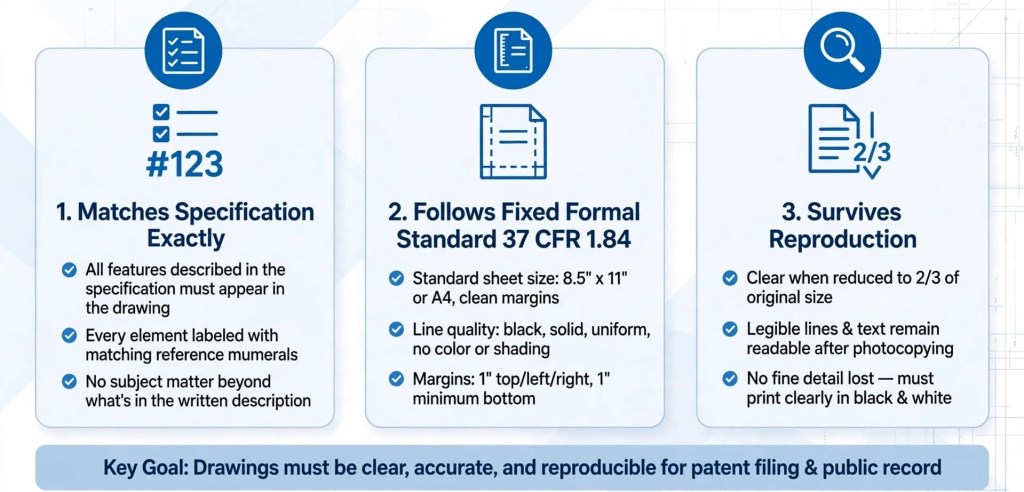
Three things distinguish a properly prepared patent drawing from an ordinary technical illustration:
- It matches the specification exactly. Every part named in the written description needs a corresponding, consistently numbered element in the drawing.
- It follows a fixed formal standard. Sheet size, margins, line weight, and view labeling are dictated by regulation, not personal preference.
- It survives reproduction. Drawings must remain legible after scanning, printing, and the two-thirds-size reduction test most patent offices apply before publication.
Why Properly Prepared Patent Drawings Matter
Examiners often review drawings before they ever weigh in on novelty or obviousness. Formal defects, such as a margin that’s too narrow or a missing view, get flagged first, and they can hold up substantive examination entirely.

This isn’t a minor administrative step. A well-prepared drawing set does three things simultaneously:
- It reduces the odds of a drawing objection that delays your filing by months.
- It sharpens the legal scope of what you’re actually claiming, since ambiguous figures invite ambiguous claim interpretation later.
- It signals to examiners, and eventually to courts, that the application was prepared carefully throughout.
Poorly executed drawings, on the other hand, are among the most common and most preventable reasons an application receives a formal office action. Because these defects have nothing to do with your invention’s merit, they’re also the easiest kind of delay to eliminate entirely with careful preparation up front.
There’s also a downstream cost that’s easy to overlook at filing time. If your drawings are ambiguous or inconsistent, that ambiguity doesn’t disappear once the patent grants; it can resurface years later in litigation or licensing negotiations, when opposing counsel argues that a poorly disclosed feature falls outside your claim’s actual scope. Preparing precise, internally consistent drawings at the outset is, in that sense, a form of risk management that pays off long after the application itself has been approved.
Patent Drawings vs. Engineering Drawings: An Important Distinction
Applicants who already have CAD files or engineering drawings from product development sometimes assume those files are filing-ready. They typically aren’t, and understanding why helps explain much of what follows in this guide.
An engineering drawing exists to support manufacturing. It carries dimensions, tolerances, material call-outs, and assembly instructions aimed at a machinist or production line. A patent drawing serves an entirely different audience: a patent examiner who needs to understand what the invention is and how it works, not how to build it on a factory floor.
| Aspect | Engineering Drawing | Patent Drawing |
|---|---|---|
| Purpose | Manufacturing & fabrication | Legal disclosure & claim support |
| Detail Level | Exhaustive, with tolerances | Only what is claimed / essential |
| Shading | Not typical | Required for design patents |
| Reference Numbers | Part numbers / BOM | Numerals linked to specification |
| Compliance | ISO / ASME standards | 37 CFR 1.84 / PCT Rule 11 |
That difference shows up in a few concrete ways when you prepare patent drawings from existing technical files:
- Dimensions and tolerances are typically removed. They’re not part of what a patent drawing needs to disclose and can add clutter that obscures the invention itself.
- Gradient shading and rendering effects are replaced with uniform line work. A photorealistic CAD render rarely survives the reproduction and reduction tests patent offices apply.
- Reference numerals replace part numbers. Manufacturing part numbers follow a completely different numbering logic than the reference characters a patent specification requires.
- Extraneous structural detail is often simplified or removed, particularly on design applications, where only the claimed ornamental features should appear in solid lines.
None of this means your CAD file is wasted effort; it’s frequently the best possible starting point. It simply means the file needs a deliberate conversion pass, not a straight export, before it functions as a compliant patent drawing.
Types of Patent Drawings You Need to Prepare
Before you prepare patent drawings, you need to know which category applies. Different patent types call for entirely different drawing conventions, and mixing them up creates confusion during examination.

- Utility patent drawings illustrate the mechanical, electrical, or structural workings of an invention, typically as black-and-white line art with numbered reference parts tied to the specification.
- Design patent drawings show only the ornamental appearance of an article: perspective, front, rear, top, bottom, and side views, with shading that conveys surface contour and broken lines that mark unclaimed context. Our design patent drawing checklist walks through the 12 formal requirements examiners check first on this drawing type specifically.
- Flowchart or process drawings illustrate steps, logic, or data flow for software and method-based inventions. Both USPTO practice and WIPO’s PCT rules treat flow sheets as drawings, not as text.
- Chemical or structural drawings depict molecular formulas, reaction pathways, or crystalline structures for pharmaceutical and materials-science filings.
Types of Patent Drawings at a Glance
| Drawing Type | Primary Purpose | Line Style | Typical Views | What Examiners Focus On |
|---|---|---|---|---|
| Utility | Illustrates function and structure | Black ink, uniform weight | As many as needed to disclose the invention | Reference numeral consistency |
| Design | Defines ornamental appearance (the claim itself) | Black ink plus surface shading | 7 standard views (front, rear, top, bottom, left, right, perspective) | Shading, broken-line use, view completeness |
| Flowchart / Process | Shows steps, logic, or data flow | Black ink, boxes and arrows | As many diagrams as the process requires | Sequential clarity, minimal on-drawing text |
| Chemical / Structural | Depicts molecules, reactions, or crystal structures | Black ink, standardized notation | Varies by compound or reaction | Accuracy against the written formula |
Knowing your category before you start prevents a common and expensive mistake: applying design-patent shading conventions to a utility drawing, or vice versa.
Core USPTO Rules to Follow Before You Prepare Patent Drawings
If you’re filing in the United States, every drawing must satisfy 37 CFR 1.84, the USPTO’s formal drawing standard. According to the USPTO’s own filing guidance, black-and-white drawings made with India ink or its digital equivalent are the default expectation, and the sheet, margin, and line-quality rules below apply regardless of drawing type.
Here’s what the regulation requires at a glance:

| Requirement | USPTO Standard (37 CFR 1.84) |
|---|---|
| Sheet size | 21.6 cm × 27.9 cm (Letter) or 21.0 cm × 29.7 cm (A4) |
| Top margin | At least 2.5 cm (1 inch) |
| Left margin | At least 2.5 cm (1 inch) |
| Right margin | At least 1.5 cm (5/8 inch) |
| Bottom margin | At least 1.0 cm (3/8 inch) |
| Line color | Black, durable, uniformly thick |
| Figure labeling | “FIG.” plus consecutive Arabic numerals |
| Color drawings | Only by approved petition (utility); more readily accepted for design applications |
A few additional rules trip up applicants regularly:
- No holes, frames, or borders may be added to a drawing sheet.
- Reference numerals must match the specification exactly and stay consistent across every figure they appear in.
- Lead lines connecting reference numbers to drawing details cannot be missing or ambiguous.
- Text on drawings is limited to short, essential labels; lengthy descriptive text isn’t permitted.
Because these rules apply uniformly whether you’re drafting a mechanical assembly or a software flowchart, treating this checklist as a first pass before you prepare patent drawings for any invention type saves a significant amount of rework later.
How Requirements Shift When You File Internationally
Domestic USPTO rules aren’t the only standard you may need to satisfy. If you’re filing through the Patent Cooperation Treaty or directly with the European Patent Office, the formal drawing requirements shift in ways that catch many first-time international filers off guard.
Under WIPO’s PCT Rule 11, international drawings must use durable, dense, uniformly thick black lines without any coloring, and every sheet must survive a linear reduction to two-thirds size without losing legibility. Flow sheets and diagrams count as drawings under this rule too, which matters for software and process patents specifically. The margin minimums under PCT Rule 11 line up almost exactly with 37 CFR 1.84, but sheet-size defaults and color policy diverge; our guide on how PCT drawing requirements differ from USPTO rules breaks down every point of overlap and divergence in detail.
Europe adds another wrinkle worth knowing about. As of a Decision of the President of the EPO dated 7 July 2025, effective 1 October 2025, colour and greyscale drawings are now accepted for European patent applications filed electronically, and they’re published in colour rather than converted to black and white as they were previously. That’s a meaningful shift for inventions where colour genuinely carries technical meaning, such as user-interface disclosures, biotech imaging, or layered material structures, though the new colour and greyscale sheets still need to meet the EPO’s 300 dpi resolution and contrast requirements.
The practical takeaway: default to black-and-white line drawings unless you have a specific technical or strategic reason to do otherwise, and never assume a drawing set accepted informally by one office will transfer cleanly to another without review.
Step-by-Step: How to Prepare Patent Drawings
Here’s the process professional patent illustrators typically follow, broken into a repeatable sequence you can apply to almost any invention.

Following this sequence in order, rather than jumping straight to drafting, is what allows you to prepare patent drawings that clear formal review without a correction cycle.
Tools Commonly Used to Prepare Patent Drawings

Most professional drafters rely on a small set of proven tools rather than general-purpose design software:
- AutoCAD for mechanical and structural inventions that need precise, measured line work.
- SolidWorks when a 3D model needs to be flattened into compliant 2D patent views.
- Adobe Illustrator for clean, vector-based line drawings, especially on design patent applications.
- CorelDRAW as another common vector platform used across patent drafting workflows.
The right tool ultimately depends on your invention’s complexity. Mechanical assemblies usually start in CAD software, while ornamental designs and flowcharts are often built directly in vector illustration tools.
Common Mistakes to Avoid When You Prepare Patent Drawings
Even experienced applicants repeat a handful of avoidable errors:
- Submitting product renders instead of patent drawings. Marketing-style 3D renders often include gradients, reflections, or soft shading that read as non-compliant under formal drawing rules.
- Letting reference numerals drift. A numeral that’s added, changed, or dropped during late-stage editing without updating every affected figure creates an inconsistency examiners catch quickly.
- Ignoring margin requirements on later edits. A figure label or lead line that creeps into the margin during a last-minute revision is a small mistake with an outsized consequence.
- Mixing sheet sizes within one application. Every sheet in a single filing needs to be the same size, whether that’s Letter or A4.
- Skipping the reduction test. A drawing that looks fine on a large monitor can lose fine detail entirely once printed or scanned at production size.
- Applying the wrong drawing convention. Using utility-style flat line art for a design application, where surface shading is often essential, is a frequent and costly mismatch; our design patent drawing checklist covers this distinction and the other 11 formalities examiners check first.
- Filing color drawings without a petition. Color content submitted informally, without the required petition and fee, is one of the more common reasons drawings get flagged during formal review.
- Treating international filings as a copy-paste job. A drawing set built for one jurisdiction doesn’t automatically satisfy another; PCT and USPTO rules overlap heavily but still diverge in a few important places.
- Waiting until after an office action to bring in a specialist. Many applicants only consult an experienced patent illustrator once a drawing objection has already arrived, which usually means paying twice: once for the original, non-compliant set, and again for the corrected replacement sheets.
None of these mistakes are complicated to fix individually. What makes them expensive is that they usually surface after filing, when correcting them means an amendment rather than a simple revision.
Expert Tips for Passing Formal Review the First Time
- Read the regulation once before you draft, not after an objection arrives. A working familiarity with 37 CFR 1.84 or PCT Rule 11 prevents most formal errors before they happen.
- Keep a running reference-numeral log. Cross-check it against the specification every time either document changes.
- Separate design intent from engineering detail. Internal mechanisms or fasteners that don’t affect an article’s visible appearance usually don’t belong in a design patent’s claimed (solid-line) portion.
- Print a test sheet before final submission. On-screen review can hide margin or scale problems that only become obvious once a sheet is physically printed or reduced.
- Loop in an illustrator early, not after a rejection. Involving someone experienced with formal drawing rules during initial drafting consistently produces cleaner first-pass results than fixing issues reactively.
- Build every view from one consistent source file. This single habit eliminates the majority of cross-view proportion mismatches applicants run into.
- Default to black-and-white unless color is functionally necessary. It remains the safest, most universally accepted format across every major patent office.
Should You Prepare Patent Drawings Yourself or Hire a Professional?
It’s technically possible to prepare patent drawings yourself using CAD or vector software, and for a simple, single-figure application, some inventors do exactly that. However, most law firms and corporate IP teams choose to work with specialists once they understand what’s actually at stake in a formal drawing review.
| Factor | Preparing Drawings Yourself | Hiring a Patent Drawing Specialist |
|---|---|---|
| Familiarity with 37 CFR 1.84 / PCT Rule 11 | Learned through trial and error | Applied consistently from the first sheet |
| Risk of formal objection | Higher, especially on a first filing | Substantially reduced |
| Time investment | Significant, particularly for multi-view design sets | Minimal beyond providing sketches or a CAD file |
| Revisions after an office action | Self-managed, often under deadline pressure | Typically included as part of the original engagement |
| Best suited for | Simple, single-figure inventions with prior drafting experience | Multi-view designs, complex mechanisms, or multi-jurisdiction filings |
If you’d rather not manage every margin calculation and reference-numeral cross-check yourself, working with a team that specializes exclusively in patent illustration can materially shorten the path from rough sketch to an examiner-ready drawing set.
How Long Does It Take, and What Does It Cost?
Timelines and pricing both depend heavily on invention complexity and filing type. A single-figure utility drawing generally moves faster than a full seven-view design patent set, and multi-jurisdiction filings (USPTO plus PCT or EPO) typically require additional formatting passes to satisfy each office’s specific rules.
As a general guide:
- Simple utility drawings (a handful of clear mechanical or electrical views) are usually the fastest to prepare.
- Design patent sets take longer because every one of the standard views needs to be internally consistent in proportion and shading.
- Multi-jurisdiction filings add time upfront but save far more time later by avoiding a second drawing pass at national phase entry.
Pricing typically follows a similar logic, whether you’re comparing freelance rates, in-house design time, or a specialized drawing service. A single-figure utility application generally costs less to illustrate than a full multi-view design patent set, and revisions matter just as much as the initial draft: a provider who charges per revision can end up costing more than a slightly higher flat rate that includes unlimited corrections until every figure is approved.
Because a drawing objection typically triggers a response period of two months or more, investing the extra time to prepare patent drawings correctly the first time is, in nearly every case, faster overall than correcting them after an office action. The math is straightforward: a proactive review before filing costs a few days of preparation, while a reactive correction after an objection costs those same preparation hours plus the lost time waiting on the notice, the response deadline, and, in some cases, extension fees.
Frequently Asked Questions About How to Prepare Patent Drawings
What does it mean to prepare patent drawings correctly?
It means producing formal, black-ink line drawings that match your specification’s reference numerals exactly and follow your target patent office’s sheet size, margin, and view-count rules, rather than submitting a product render or informal sketch.
Do I need a professional to prepare patent drawings, or can I do it myself?
You can prepare simple drawings yourself if you’re comfortable with vector or CAD software and familiar with the relevant formal rules. Multi-view design sets, complex mechanisms, and multi-jurisdiction filings generally benefit from a specialist who works with these standards daily.
What file format should I use when I prepare patent drawings for filing?
PDF is the most widely accepted electronic filing format across major offices, though some accept TIFF as well. Always confirm the specific requirement for your target office before final submission.
Can I use color when I prepare patent drawings?
Black-and-white line drawings are the default. USPTO utility applications require an approved petition for color, design applications may include it more readily, and the EPO now accepts colour and greyscale drawings for electronic filings made on or after 1 October 2025.
How many views do I need when I prepare patent drawings for a design patent?
As many as necessary to fully disclose the design’s appearance, typically seven standard views (front, rear, top, bottom, left, right, and perspective) for a three-dimensional article.
Do provisional patent applications require formal drawings?
No. Informal sketches are generally acceptable at the provisional stage, as long as they clearly disclose the invention. Formal, fully compliant drawings become necessary when you file the corresponding nonprovisional application.
What happens if I don’t prepare patent drawings to the correct formal standard?
The examining office will typically issue a notice requiring corrected drawings, adding a response period (often two months or more) to your application’s timeline. It’s a delay, not an automatic rejection, but it’s also entirely avoidable with careful preparation.
Are the rules different if I prepare patent drawings for a PCT application versus a USPTO filing?
They overlap substantially, particularly on margins and line-quality standards, but diverge on sheet-size defaults and color policy. Reviewing both standards before you draft, rather than after WIPO or the USPTO flags an issue, prevents a costly second pass.
Can I convert an existing CAD file when I prepare patent drawings, or do I need to start from scratch?
An existing CAD file is often the best possible starting point, but it usually needs a conversion pass rather than a direct export. Dimensions, tolerances, and rendering effects generally need to be stripped out and replaced with uniform black line art and properly placed reference numerals before the file meets formal drawing standards.
How do I know which patent office’s rules apply when I prepare patent drawings?
It depends on where and how you’re filing. A U.S.-only utility or design application follows 37 CFR 1.84, an international application filed through the Patent Cooperation Treaty follows PCT Rule 11, and a European filing follows the EPO’s own presentation rules. Many applicants preparing for multi-jurisdiction protection design their drawings to the stricter of the applicable standards from the start, so the same sheet set satisfies more than one office without rework.
Get Your Patent Drawings Right the First Time
Learning to prepare patent drawings properly isn’t a box to check before filing; it’s one of the highest-leverage steps in the entire application process. From choosing the correct drawing type to verifying margins, reference numerals, and view counts against the exact standard your target office applies, every stage carries real consequences for how smoothly your application moves through examination.
Whether you handle this in-house or bring in specialists, understanding what examiners check first puts you in a stronger position from day one. If you’d rather skip the trial and error entirely, get your patent drawings prepared by PatentVisuals and move into examination with a compliant, examiner-ready drawing set from the start.
